How To Establish Mobile Bitcoin Privacy With A Pixel 4a And CalyxOS
This step-by-step guide walks you through how to establish a privacy-enhanced mobile phone for use with KYC-free Bitcoin.
This is a step-by-step guide on how to privately purchase a Google Pixel 4a mobile phone, flash it with the privacy-enhancing CalyxOS operating system and use it to guard your privacy while on the go. With such a device, one can utilize Bitcoin more privately and freely from anywhere. If you are prepared to give up your current phone number and switch to Android, then this guide will show you how to reclaim your privacy while maintaining your mobility.

For many people, their mobile phone is at the center of all of their communications and nearly all of their activity. You may depend on your mobile phone for sending emails, posting to social media, keeping track of contacts, password managers, using maps, voice communications, text messaging, video conferencing, banking details, third-party payments, Bitcoin wallets, photographs and videos, audio recordings, notes, music preferences, audio books, shopping history, health statistics, location information and more.
That’s a lot of details about a person, and this is generally normal in this day and age. Billions of people globally depend on their mobile phones to interact with the world around them. Mobile phones have put an impressive level of technology and connectivity into the hands of most people on Earth. This is also fueling the data harvesting industry.
It cannot be denied that the level of data harvesting from huge tech companies like Google is staggering. Projections place revenue from big data and business analytics at $274.3 billion globally by 2022. Google specifically controls about 62% of mobile browsers, 69% of desktop browsers, 71% of mobile device operating systems and 92% of internet searches worldwide. Every single click, search, key-stroke, motion, movement and any other data point that can possibly be monitored is being collected and used in Google’s revenue model. To learn more about how your data is used by Google visit this page, where you can find this helpful info-graphic:
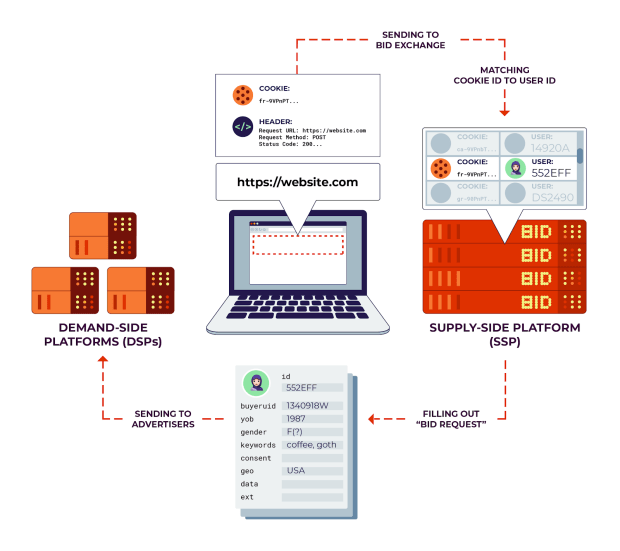
On your mobile device specifically, Google isn’t the only one getting your information. You are also sharing a lot of data with your cell phone service provider and with the applications you use on your device. If the data collected from the apps on your phone is not being sold directly to Google, then it is likely being used in a similar revenue model by the app developer.
A team of researchers from Trinity College Dublin claim that Google collects 20 times the amount of data about Android users than Apple collects about iPhone users. Its full technical text can be found here. Although it does not appear to be peer reviewed or published by a scientific society, so take that for what it’s worth.
Even if the amount of data being collected is off by an order of magnitude like a Google representative has claimed, that is still a staggering amount of information about you and your activities being collected.
Like most honeypots, this creates a bifurcated threat for the end user. On one hand, your government could gain access to this data, threatening your freedom. On the other hand, an attacker could gain access to this data, threatening your life. Either way, there is action that you can take to defensively guard your privacy. One of the steps you can take is to flash a privacy-focused operating system onto your mobile device.
“CalyxOS is an Android mobile operating system that puts privacy and security into the hands of everyday users. Plus, proactive security recommendations and automatic updates take the guesswork out of keeping your personal data personal.” -CalyxOS.org
Turnkey Solutions
If you are interested in the advantages of a CalyxOS but for whatever reason you do not want to set it up yourself, there are options available for a turnkey solution that offers you everything ready to go out of the box. Mamushi Mobile offers secure phones with CalyxOS installed. Mamushi Mobile accepts bitcoin and XMR.
Step One: Obtain A Mobile Device
You may already have a suitable Android device for flashing CalyxOS, you can view a list of compatible devices here. Keep in mind that your device will need to be “unlocked” in order for this to work. In the U.S., Google Pixel phones from Verizon have a locked boot loader that blocks OS flashing. If you don’t have a suitable device, then you will need to get one and there are some considerations I recommend before doing so:
- Registering a phone with a mobile carrier will attach your personally-identifiable information (PII) to the device and the SIM card.
- Purchasing a phone with a credit/debit card could potentially link PII to the device.
- The Google Pixel 4a offers robust hardware for a reasonable price, about $350. In my opinion, this is the most well balanced phone for security, performance and price.
In order to avoid the first consideration, I recommend buying an unlocked phone from a box store like Best Buy. And to avoid the second consideration, I recommend using bitcoin to purchase a Best Buy gift card from BitRefill then using the gift card to buy the phone in person.
Now, if you decide to use bitcoin for this, there are some additional considerations I recommend:
- First, obtain your bitcoin without using KYC information. Do this by mining it, or by using a peer-to-peer exchange, or by earning it in exchange for goods and services or by using a Bitcoin ATM.
- Second, CoinJoin your bitcoin in Whirlpool to break the deterministic links to your on-chain history.
- Then, use your post-mix outputs to build a Cahoots transaction with a peer to spend to BitRefill.
Once you have your gift certificate, Check online to see which stores near you have the device in stock. You can print out your gift certificate, but from my experience at Best Buy, it is easier for the employee if you just have the barcode pulled up on your phone for them to scan.
Based on my experience, when I bought my Pixel 4a I was not asked for identification or for my name. But that doesn’t mean everyone will have the same experience. Consider visiting your local store during peak volume business hours to leverage the advantage of the staff being busy and more likely to just get the sale completed so they can move onto the next customer. In the event that you are asked for personal information, the veracity of that information is at your discretion.
If everything went according to plan, then you should now have an unlocked Google Pixel 4a that is not tied to your identity.
Step Two: Unbox The Pixel 4a
First, remove your device from its packaging and check it for any damage.
Next you will need to get a few things ready on your desktop computer. You can set your Pixel 4a aside for now.
Step Three: Select And Download CalyxOS Image To Your Desktop
This will download the image file that will be used to generate the Calyx operating system on your phone. You can do this from Linux, MacOS or Windows. These instructions are for Windows.
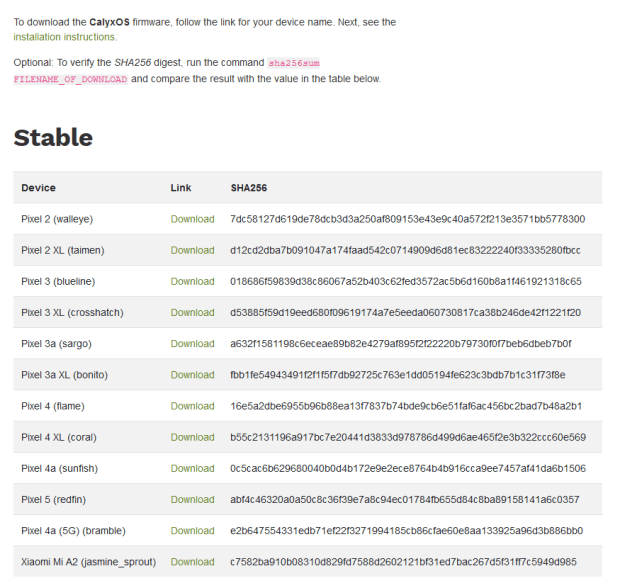
Navigate to https://calyxos.org/get/ and select the download link for your device. I purchased a Pixel 4a without 5G capabilities, so I chose the Sunfish link. Make note of the hash value next to the download link. Ideally, CalyxOS would provide a PGP signature but this will have to do for now.
Next, you will want to calculate the hash value on the ZIP archive that you just downloaded. If you downloaded the Sunfish ZIP archive like I did then it should be called “sunfish-factory-2021.03.04.13.zip” and it should be roughly 1.3 GB in size.
I use a program called HxD to easily load a file and run a checksum. HxD has other cool features if you’re into viewing metadata or need a good hex editor. HxD can be downloaded here.
Once you open the ZIP archive in HxD, navigate to “Analysis>Checksums,” then scroll down to “SHA256.” Now you can compare your hash value to the one on the CalyxOS website.
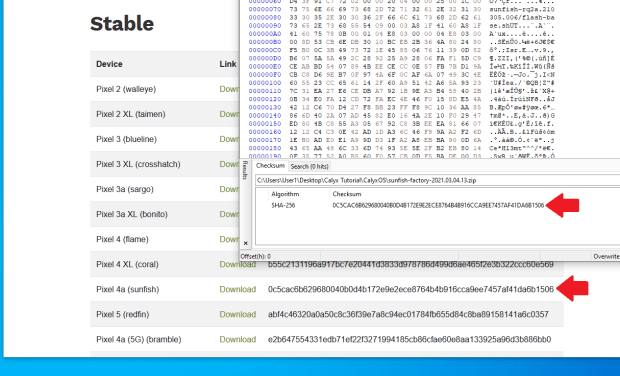
Note: Always check the CalyxOS website for the most up-to-date hash values.
Once you have the ZIP archive hash value verified, do not unzip it. Just leave it for now and we’re going to do a couple of other things first.
Step Four: Select And Download Device Flasher To Your Desktop
This will download the executable file that will help get the CalyxOS image file onto your phone. You can do this from Linux, Mac OS or Windows. These instructions are for Windows.
Navigate to https://calyxos.org/get/install/ and select the appropriate flasher for your desktop. Make note of the hash value on the website. On Windows, you are likely to start running into errors at this point. Your browser will probably tell you that it prevented this file from being downloaded because it is “suspicious.” If at first you do not succeed, try a different browser. I was able to get this to download with Firefox and then selecting the options to override the “security” warnings.
Once you get the file downloaded it should be called “device-flasher.exe” and it should be roughly 6.8 MB in size. Again, you will want to follow the same process as used above to verify the hash value of the flasher file.
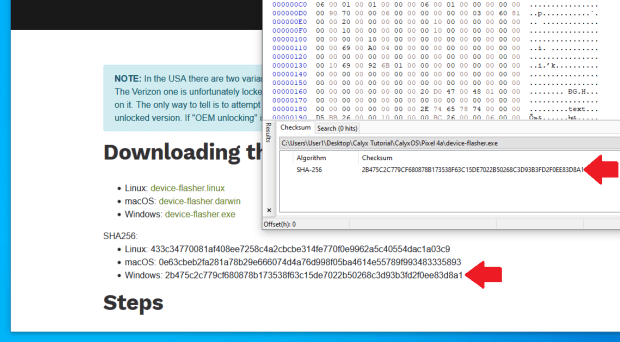
Note: Always check the CalyxOS website for the most up-to-date hash values.
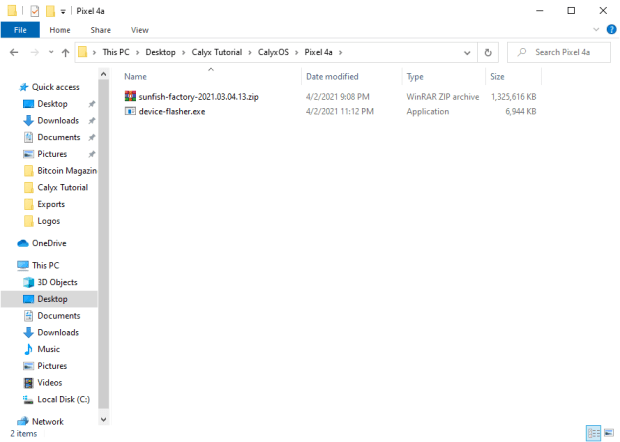
Now you want to create a new folder and put the image file ZIP archive and the flasher executable file in this folder with nothing else.
Step Five: (Only For Windows) Check Your USB Driver
You need to make sure that your computer has the appropriate USB driver installed for talking to your Pixel 4a. What worked for me was the standard MTP USB driver installed on my computer. Here is how you can verify:
If you haven’t done so already, go ahead and connect your Pixel 4a to your desktop, turn it on, do not insert the SIM card yet, step through all of the setup prompts skipping the parts where it asks you to enter personal information, and connect to WiFi. Here is a video of the whole initial set up:
Next, on your desktop, open your computer manager by right-clicking on “This PC” from your file explorer.
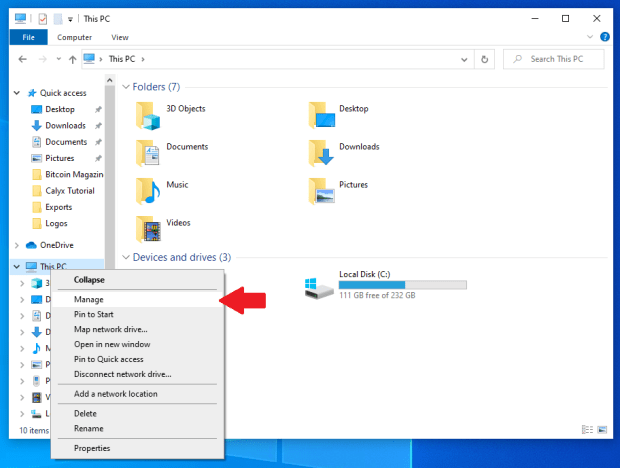
You should be looking at your computer management window now.
Click on “Device Manager>Portable Devices>Pixel 4a.”
Right click on Pixel 4a and select “Properties.”
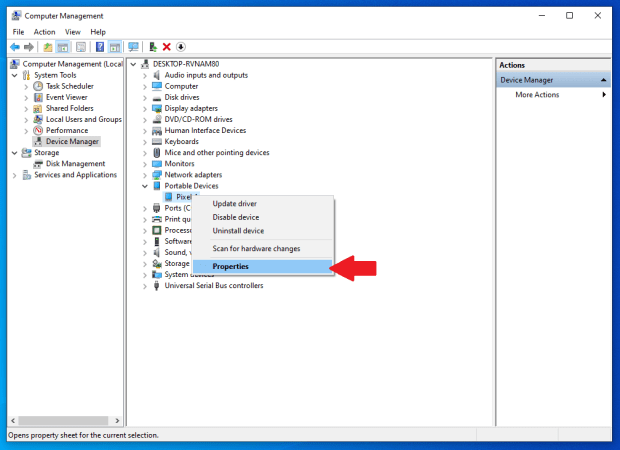
Click on the “Details” tab and then from the drop-down menu choose “Driver Description.”
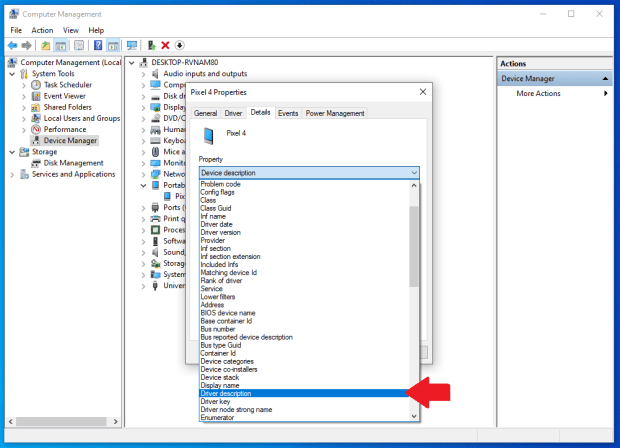
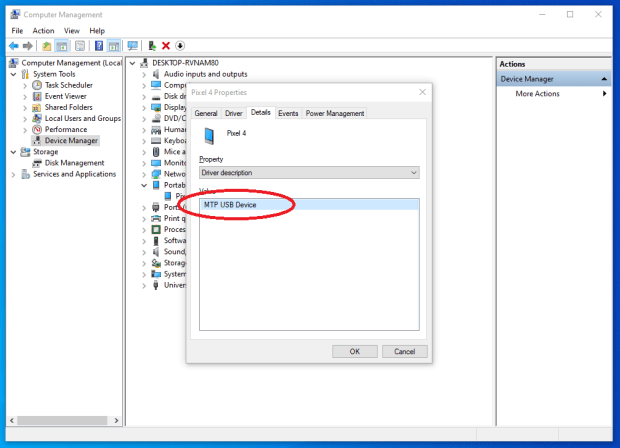
You want to see “MTP USB Driver” here.
If you have a different driver then you may need to update it.
To update your USB driver, you will first need to download the Google USB driver. This driver along with more detailed instructions can be found here. This will download another ZIP archive called “usb_driver_r13-windows.zip” which should be roughly 8.3 MB in size.
Save this ZIP archive to a different folder location than the folder with the CalyxOS image file ZIP archive and device flasher executable file.
Then extract the Google USB driver ZIP archive.
Navigate back to your Computer Management window.
Go back to “Device Manager>Portable Devices>Pixel 4a.”
Right click on “Pixel 4a>Update Driver,” this will launch the Update Wizard.
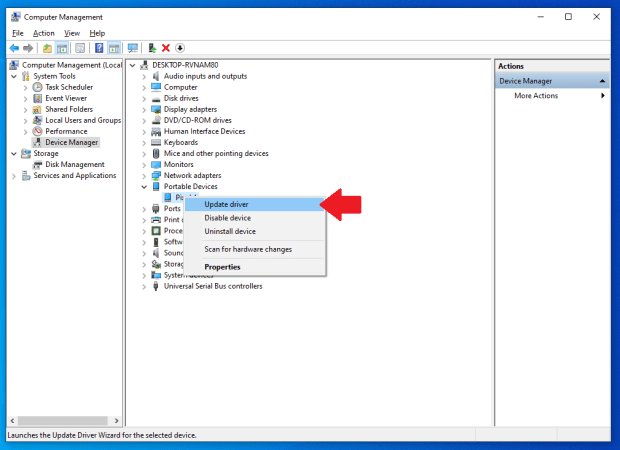
From the Update Wizard, it will ask you where to find the new USB driver, point it to the folder location that you extracted the ZIP archive contents to.
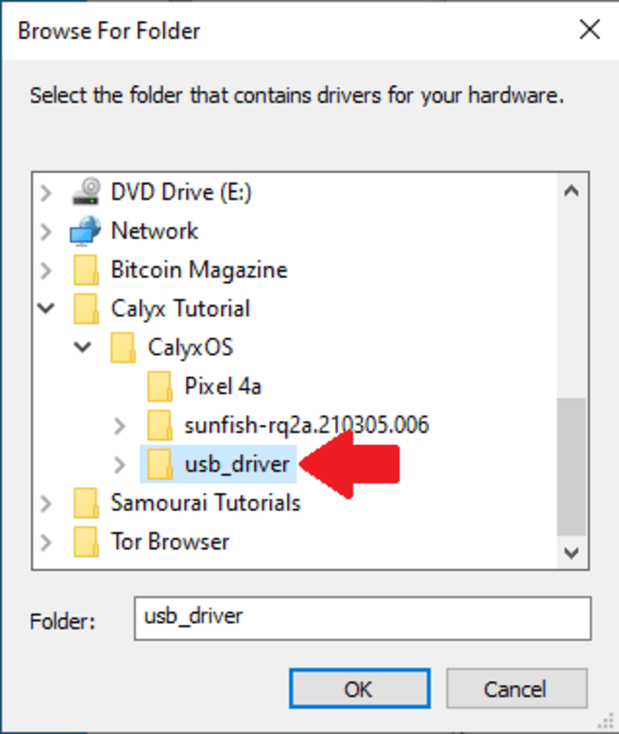
Select “OK.”
Then the Update Wizard should walk you through the rest of the necessary steps.
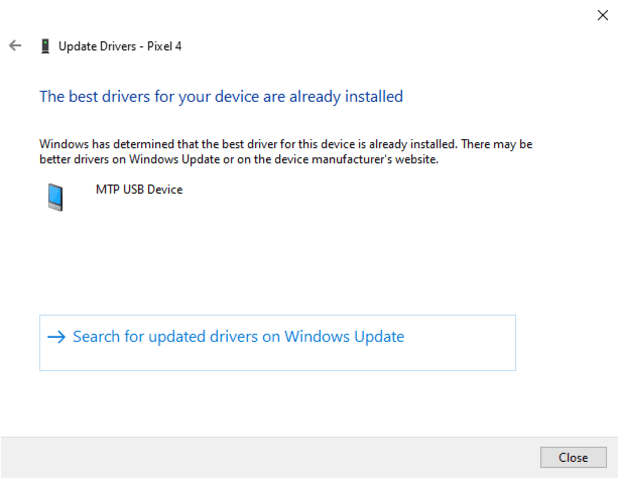
If you encounter problems with updating your USB driver through Windows Computer Management, it may be necessary to install Android Studio and then update the USB Driver with the SDK manager. I’m not entirely sure what happens after you tell the Update Wizard which driver to use since my computer already had a working driver. I imagine that you should be able to go back through the steps to check if you have the best driver installed and end up looking at a message like the one in the image above.
Step Six: Flash CalyxOS Onto Your Pixel 4a
This will use the CalyxOS image file ZIP archive and the device flasher executable file to flash the new operating system onto your Pixel 4a. You should have already connected your phone to your desktop, powered on the phone, followed the setup prompts and connected to WiFi. Your computer should also be able to talk to your phone with no issues.
Navigate to the folder where you placed the CalyxOS image file ZIP archive and the device flasher executable file. The ZIP archive should still be unzipped. If you already extracted the contents then this won’t work, so if you did that, then delete the extracted contents. The only things you want in this folder are the CalyxOS image file ZIP archive and the device flasher executable file. Like this:
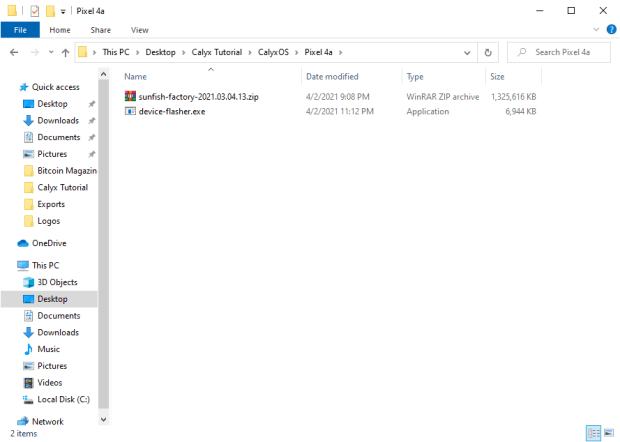
Double click on the device-flasher.exe and this should initiate the process. If this fails to initiate the process then you can try to do it from the command line by hitting the Windows key and r, then type “cmd” in the dialog box that pops up.
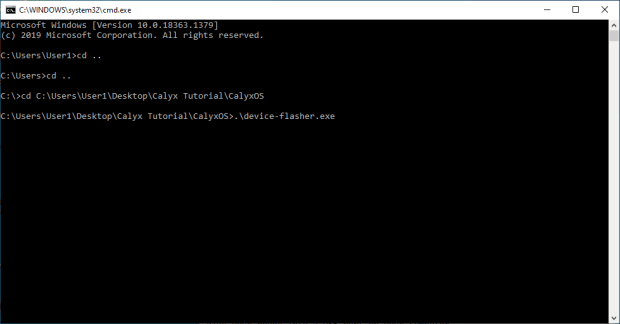
Once the command terminal launches, you can use the “cd ..” command to change your file path all the way back to the C: drive if you need to. Then you can change directory (“cd”) to the file path which points to the folder with the CalyxOS image file ZIP archive and the device flasher executable file. Once there, enter “.device-flasher.exe” and hit enter. This should get the process started and then you should be looking at something like this:
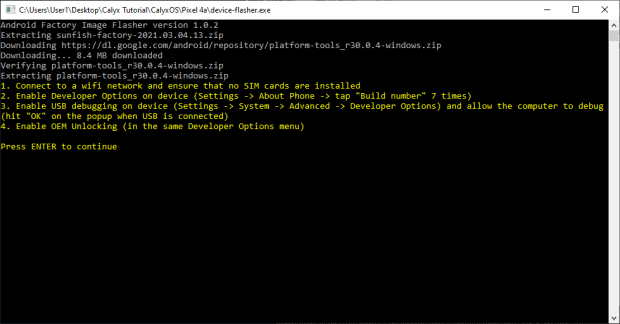
Whether you double clicked on the device-flasher.exe or used the command line to launch it, the result should lead you to looking at the message in the image above.
Next, follow the instructions in yellow on the Pixel 4a:
- Ensure the Pixel 4a is connected to WiFi and there is not a SIM card installed.
- Navigate to “Settings>About Phone>Build Number” then tap on “Build Number” seven times to enable Developer Mode.
- Now navigate to “Settings>System>Advanced>Developer Options” then enable USB debugging and hit “OK.”
- Also from this Developer Options menu, scroll down and enable “OEM Unlocking.”
Once you have completed the four steps above, go back to your desktop keyboard and hit “Enter.”
The flashing script will start to run and then, in the terminal window, it will prompt you to unlock the bootloader from your Pixel 4a.
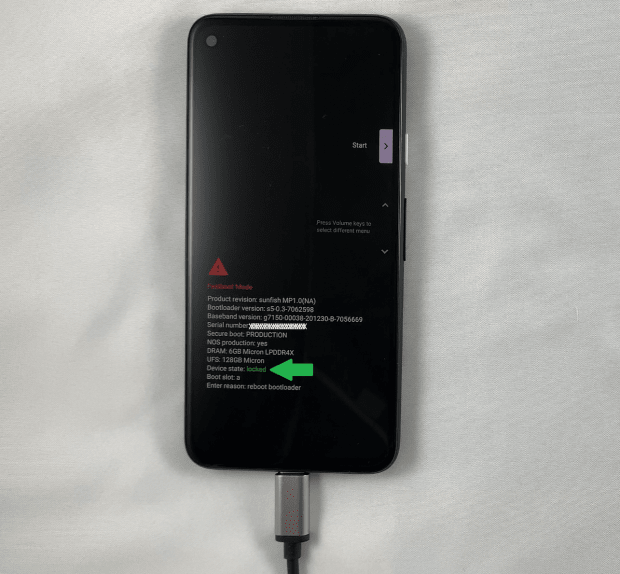
On your Pixel 4a, you will see a short description of some product and device information. You will notice that it indicates in green that the device status is locked:
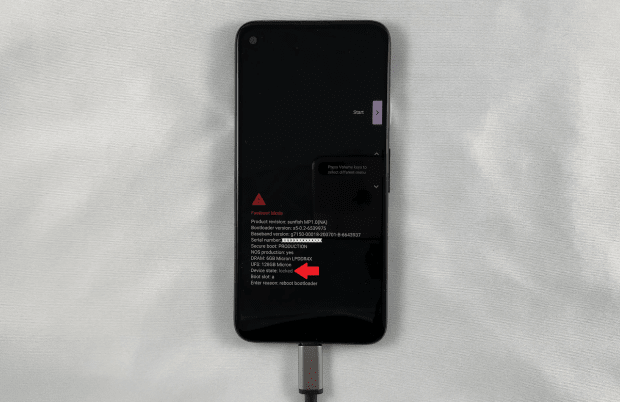
After a moment, the message on your Pixel 4a will change to a warning about unlocking the bootloader. You should see “Do not unlock the bootloader” next to the power button.
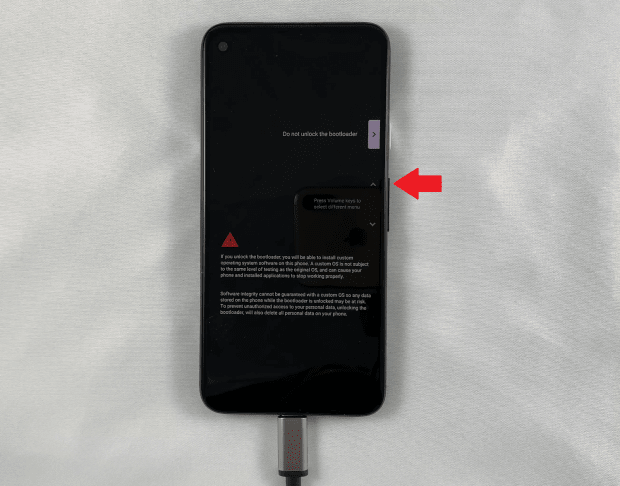
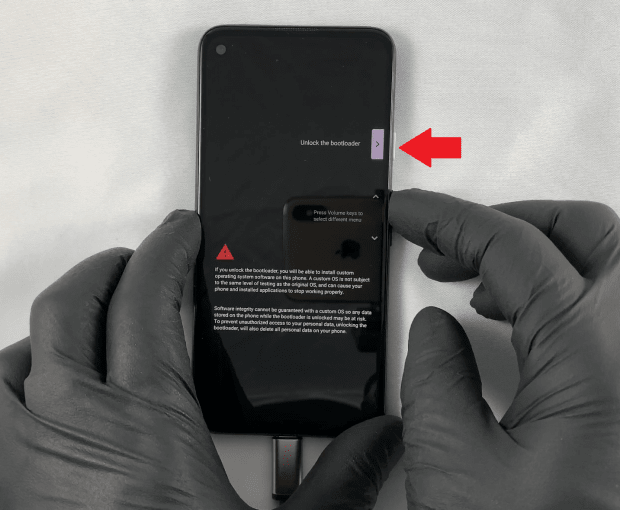
Using the volume buttons, you can scroll through the available action options. Continue pressing the volume button until you see the action option to “Unlock the bootloader.” Then press the power button.
The Pixel 4a should now redisplay the original screen with the product and device information, but this time, you will notice that the device status is “Unlocked” in red.
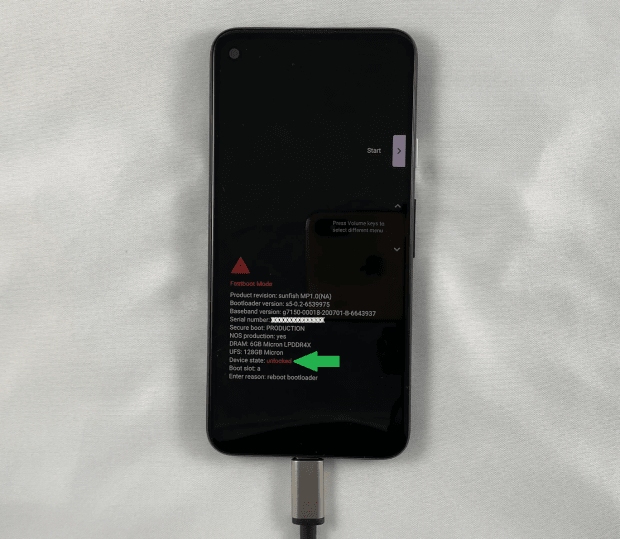
The flashing script should continue automatically at this point, you should not have to press the start action with the power button on your Pixel 4a. The Pixel 4a may disconnect and reconnect to your desktop a few times, with the screen on the Pixel 4a resetting each time. This is normal. After a moment, you should see this screen:
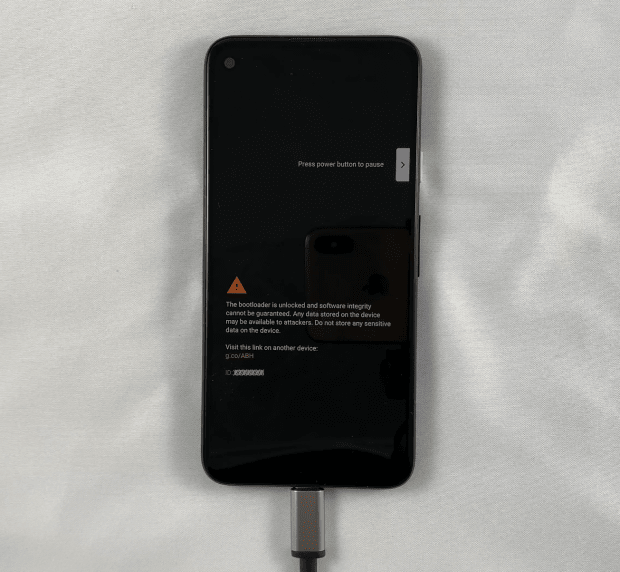
This message should be immediately followed by the “fastbootd” screen:
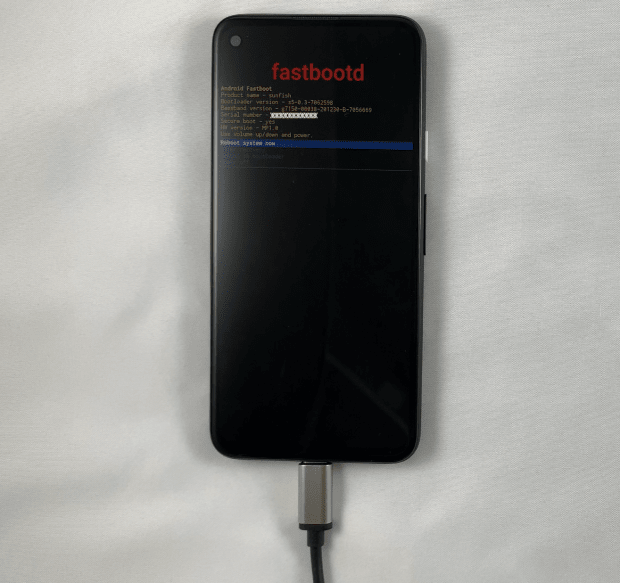
The fastbootd screen should remain for a few moments while the new image is flashed. Then in the terminal window on your desktop, when the script is all finished running, it should indicate to you to exit by pressing any key.
That completes the process of flashing CalyxOS onto your Google Pixel 4a. Congratulations. You will want to be sure to lock the bootloader again when you see the screen in the image below:
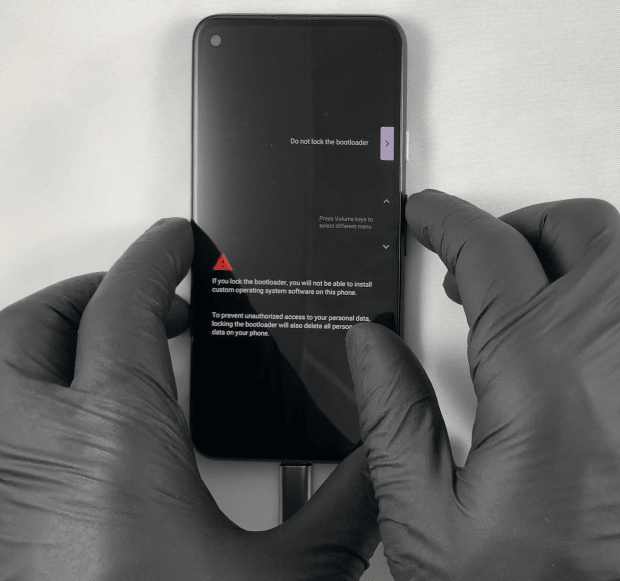
Again, use the volume keys to select the action option to “Lock the bootloader.” Then press the power button to initiate this action:
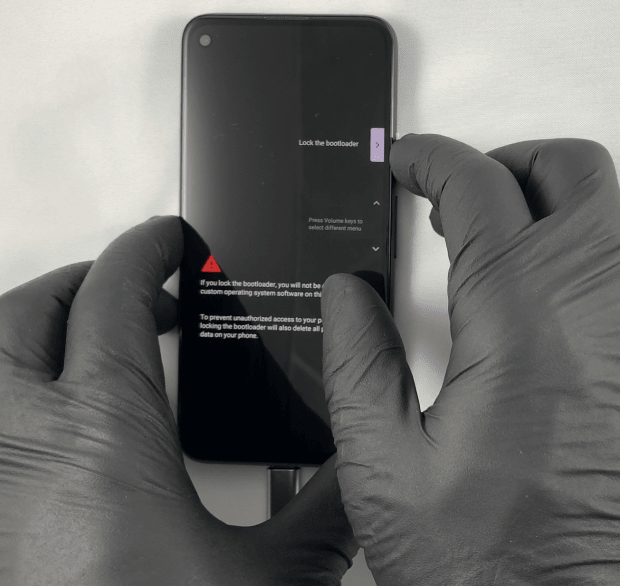
You can confirm that your bootloader is now locked again by the indication in green on this screen:
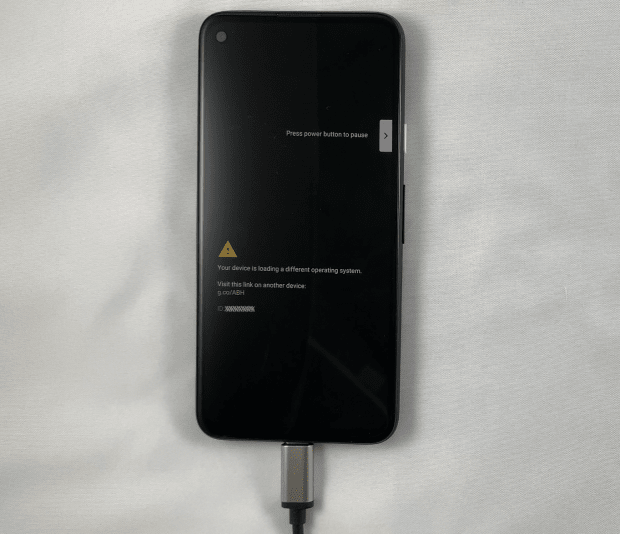
You will receive a message confirming that your Pixel 4a is loading a different operating system. Then it will automatically reboot.
Once rebooted, your Pixel 4a will load and open CalyxOS and you can follow all the initial startup prompts and configure your settings how you like.
One option you will have during the initial startup process is to enable or disable MicroG. This implements Google Compatibility Services, enabling MicroG after the fact may cause certain apps to react erratically. Uninstalling and then re-installing certain apps may be required in this scenario. If you are not sure whether or not the apps you want to use will need Google Services, then just leave MicroG enabled.
MicroG is an open-source replacement for Google Play Services but without the advertising and location tracking parts. Here, you can read more about which parts of Google Play Services have been incorporated to MicroG.
The basic idea is that with MicroG you should have an easier time using more apps, getting push notifications and using maps without revealing your personal information to Google’s servers. This is a personal choice.
Step Seven: SIM Card And Carrier Services
You may be using your new Pixel 4a strictly as a secure and private device for your Bitcoin wallet or secure messaging, etc. However, you may also want to use it as your regular phone as well. In this case you will need to pay for mobile cellular services and this is where you may want to make some careful considerations. If you go to a large service provider like Verizon or AT&T then they will register your Pixel 4a with your personal information which defeats some of the privacy benefits that brought you here in the first place.
One option is to buy a prepaid and reloadable SIM card from a smaller carrier. You should be able to find these SIM cards at the same store where you bought your Pixel 4a. In this case, you can purchase the prepaid and reloadable SIM card using the same gift card you bought at BitRefill, this way there is no personally identifying information attached to your new SIM card.
Simply log on to the SIM card provider’s website and activate your new SIM card. You may be asked for your name and email address. The veracity of the information you provide is completely up to you. I recommend using a burner email address that doesn’t reveal any personal information. Then you will be asked to enter a ZIP code so the service provider can assign you a new phone number based on that area. You will also need to enter the serial number of your SIM card during the account activation. If your selected service provider has SIM locking features, utilize them.
Once your account has been activated, insert the SIM card into your Pixel 4a. You now have a fully-functioning mobile phone that is not attached to your identity in any way. Once your plan nears expiration you will need to think about how you can reload your SIM card while protecting your private information. Consider using a private debit card or alternatively, consider using an e-SIM paid for using bitcoin like the ones provided by Silent Link. Silent Link e-SIM cards are compatible with Google Pixel 4a running CalyxOS. The phone number you receive from Silent Link will be a United Kingdom (+44) phone number. This is a good option for having a private phone number that supports SMS messaging which can come in handy when needing text verification at a Bitcoin ATM for example. Silent Link services do not support legacy GSM voice calls however. So weigh your options and proceed however you see fit.
Additional Resources
I have been using my Pixel 4a with CalyxOS for a few days now and I have been very impressed with it overall. CalyxOS comes with several privacy-focused apps pre-installed like Signal, Calyx VPN and Briar. I recommend enabling the CalyxOS VPN for encrypting your internet access. Some apps don’t work on “de-Googled” phones, I cannot install the Twitter app for example, but I can use the Chromium web interface to access it and it looks and feels just like using the app. Not all of the conveniences you may be used to will be available on your “de-Googled” phone, but the privacy benefits outweigh the cost of these conveniences in my opinion. Below I make a few recommendations on apps that you may be interested in.
- Bitcoin Wallet: Samourai Wallet
- Password manager: KeyPassDX
- Authenticator: Aegis
- Email: Tutanota
- PGP manager: OpenKeyChain
- Messaging: Telegram and RocketChat
There is also a Telegram channel where you can find support from the CalyxOS community here.
This is a guest post by Econoalchemist. Opinions expressed are entirely their own and do not necessarily reflect those of BTC Inc or Bitcoin Magazine.


